


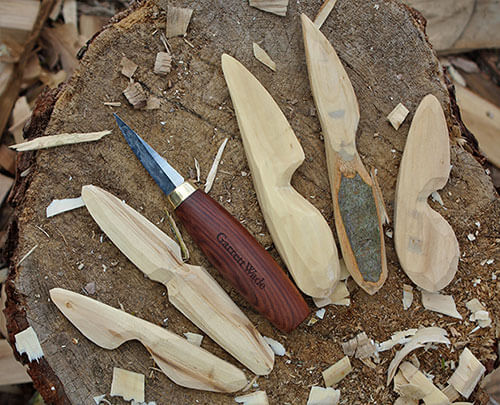
In these strange times of Stay at Home Orders and pandemic isolation, many of us are finding solace in creative expression. Whether that means caring for your sourdough starter like it’s a newly adopted pet, crafting, or simply crossing things off the To-Do list, hands-on projects bring joy in these hard times. I have been using this time to sit on wood stumps and carve green wood into useful kitchen tools. After reading the Green Woodworking Primer, I’m sure many of you were inspired to jump into the world of green woodworking as well. One of the most accessible and versatile projects to start with is the humble butter knife. They can be carved with as little as two carving techniques and only require a carving knife. Other tools help with efficiency, but are not necessary. Butter knives can range in fanciness from a stick you spread peanut butter with on camping trips to an ornate accent piece on your charcuterie board. There are a range of popular shapes and designs that all have the same two components: a rounded “handle” and a flattened “blade.” Other than that, the sky is the limit. Below you’ll find all the information you’ll need (and then some) to successfully craft your first green wood butter knife.

Tools and Materials
- First Aide Kit
- Optional: cut-resistant safety gloves
- Optional: hatchet and saw to prepare knife blank from a larger piece of wood
-
A Small Carving Knife
- A butter knife blank (more on that in preparing your materials)
- A pencil that can write on wet wood. (I prefer anything above a 4B pencil)
- Optional: Micro carving tools for decoration and lettering
- Templates. The following templates are great beginner butter knives to carve. Note the grain orientation on each and the carving directional arrows. These will help ensure that you carve with the grain and will result in a smoother finished project. Download Butter Knife Template

Preparing your Materials
Before you start carving your butter knife, you will need a knife-sized blank. I like to split a piece of wood from a log with my hatchet and a mallet. The knife blank should measure approximately 6” L x 2”W x 1”D.

If you don’t have a hatchet or a way to split wood, you can also carve this project out a tree limb that is at least 2” in diameter by carving a flat plane on both sides wide enough to trace your template.

Most species of wood will work for carving, but some are better than others. I prefer to use hardwoods instead of softwoods so that the blade of the butter knife can get thin enough to cut butter while maintaining strength. Species that are well-suited for beginners include birches, maples, poplars, alders, and willows. Harder woods for more advanced carvers include cherry, walnut, ash, apple, plum, pear, elm, etc. Once you have a knife blank, print and cut out the template of your choice and transfer it onto the wood blank by outlining it with your pencil.

Be sure to orient the wood grain properly and line up one side of the template with the edge of your blank to reduce the overall amount of carving. If you are unfamiliar with wood grain, it is helpful to transfer the carving direction arrows from the template to your blank.
A Note on Safe Carving Techniques:
There are many ways to use a carving knife that are safe and effective. This project requires just two basic techniques to complete safely and successfully. They go by many names, but I refer to them as the Straight Cut and the Push Cut:
1. The straight cut: This basic knife technique is great for carving long, thin shavings from flat sections of your project. You’ll be using it for bulk wood removal and for the back of the knife and the sides of the blade. With a fist grip on both your tool handle and your wooden project, lay the bevel of your knife flat on the wood surface and carve shavings down and away from yourself on the front half of the project. When you want to carve the other side, simply flip the project around and continue.

2. The push cut: This technique is great for carving more detailed sections, rounding edges, and carving the valley between the handle and the blade of your butter knife. Unlock the thumb on your project hand and set it on the back of the knife handle (it is very important not to set it on the back of the blade). Use your thumb to push the blade. Your carving range of motion should be under an inch and your thumb should never leave the back of the knife handle. This ensures that your thumb is in total control which allows you to carve more accurately and safely.

Whether you just picked up a knife for the first time, or have been carving for years, it is always a good idea to refresh on basic safety precautions:
- Always have a first aid kit and the knowledge to use it.
- It’s always best to carve with supervision. This can be as simple as letting someone in your house know that you are carving.
- When carving, be sure to maintain a fist-grip around your tool handle and make sure that you are not in the path of your knife blade. There are some advanced techniques that involve carving toward yourself in a controlled way, but none of them are required for this project. Remember: the more force you put into your knife stroke, the less control you have.
Steps
1. Bulk removal of wood from the sides of the drawn template. Using the straight cut, carve away the wood on the outsides of your pencil lines so that the project becomes as wide as the widest points the template.

2. Carve the profile of the blade. Using the straight cut and adding some finishing touches with the push cut, carve to the pencil lines on your blade.

3. Round the back of the handle. Using a combination of the straight cut and the push cut, carve the back of the handle to your drawn lines. Pro tip: carve short, shallow shavings off of the end of your project and work your way backwards to avoid digging into the grain too deeply.

4. Push cut the valley between the handle and the blade. The valley between the handle and the blade is the trickiest part of this project. Holding the handle side, use the push cut to carve from the handle toward the midpoint of the valley. The shaving will still be on your project. Then, flip your project around and carve from the base of the blade to the midpoint of the valley, trying to meet your previous shaving. This should release the 2-sided shaving from your blank. Repeat this process until you have carved to your pencil lines. When in doubt, refer to the carving directions on the template.

5. Carve the sides of the blade. at this point, you have carved to the pencil lines of your template, and you basically have a 2-dimensional butter knife. Time to thin the sides of the blade so they wedge to a sharp edge. Use your carving knife for reference.

6. Chamfer and finish up rough edges. By now you have a functional wooden knife that can likely cut soft cheeses and spread butter, but it still has some rough edges. Take some time to clean up any rough or sharp edges by carving off delicate, thin shavings with the push cut.

Finishing your project:
Once you have finished shaping your butter knife, it’s time to let it dry. Since the project is carved from green wood, it will now need time to cure. Wood will crack of it dries at uneven rates, so it is important to dry thicker pieces more slowly by drying them in a cool dark place. This project should take 2 to 5 days to dry, depending on drying conditions.
There are a couple options for finishing your butter knife once it has dried. Most people prefer to sand them smooth, starting with a lower grit (100 or 120) and working up incrementally to a higher grit (between 400 and 600). Another option is to very delicately go over the entire project with your knife, making smooth clean cuts called finishing cuts. Since the wood pores are closer together, finishing cuts leave a very smooth finish and some prefer the look of tool marks. A third option is to use cabinet scrapers and a burnisher (either ceramic or antler work great).
Decorating. There are many ways to decorate your butter knife. You can use detail knives to carve lettering or designs into the handle, or you can paint the handle.
Once you have achieved the desire finish and decoration, it is recommended you treat the butter knife with a food-safe oil that won’t go rancid (you can use most kitchen oils aside from olive oil). Drying oils like walnut and linseed work well, but most varnishes and lacquers are not food safe and should be avoided. Once the oil has soaked in or dried, your butter knife is ready to use!

