
Japanese Garden Tools Vs. American: What’s the Difference?
You may have seen Japanese gardening tools popping up more in stores and online. Sure, they&rs… Read More

Obviously, I know about knives.
I mean I should. I make shoes from scratch—by hand. “Unplugged” as they say. There are many steps in the completion of a pair of shoes or boots that require a knife. Or a variety of knives. Lots of trimming, carving, skiving, marking, grooving—and a million other things. So, one would think I know exactly the best knife for each job. And, that I should be able to recommend one that would work for you—if you were to go into the shoemaking or leather-working business.

Well, you are mistaken. In essence there are many, many factors to consider.
Since we all have variations in hand size, strength, and levels of technique and flexibility, the type of knife we choose depends not just on preference, but also on our own personal abilities. What works for one person might not work for the other. As we become more skilled with time, practice and strength acquired, we might expand our knife selection or even go back to a knife that has given us endless hours of frustration in the past.
I have tried many different knives in my shoemaking career. Every time I had the opportunity to work with a shoe- or bootmaker I would get to know their preferred tools, learn different techniques of making, and hear great stories of how they got into the trade. Every maker has a knife or two they prefer over the others; sometimes a particular knife falls out of favor over a new (or old) one. Every maker has a particular way of sharpening and keeping their tools sharp over time, with different theories as to why one method is preferred over another. Somehow, we all found our favorite tools and know exactly—more or less—how to keep them in top condition to do an excellent job.

How did you get there? you might ask. Well, from my perspective, through trial and error. A knife is an interesting tool. Ideally this razor-sharp device becomes an extension of your hand, transforming the raw force and technique into a controlled movement starting from your shoulder, flowing into your arm, and then down into your wrist, your hand, your individual fingers, and finally, into the knife itself—at a precise angle onto whatever material you are working with.
When you have finally found your favorite knife, another big topic is sharpening. Whether you prefer wheels, water-stone, oil-stone, a set of diamond stones or just a strop with emery cloth and rouge (there is wide variety of methods), the selection is a personal one based on technique, style and even the type of metal your knife is forged from. In any case, I always recommend keeping your knife VERY sharp. A blunt knife is dangerous.
About that: Nothing is just simple – I have gone through extensive periods of frustration to find my current sharpening routine. I started out with using just a “strop” – imagine a two-sided paddle of wood with a handle – on one side a strip of emery cloth – on the other a piece of veg-tan leather, mounted flesh side up and conditioned with green “rouge” (a compound that takes the metal shards – or “burr” off the edge’s blade), maintaining the sharpness of the knife. That worked to some extent. If you have very large, strong hands you might get through tough leather with just that. But it left me unsatisfied and thinking there could be a different way that suited me better.
I went through a brief love affair with water-stone (in my tiny studio at the time deemed too messy and no consistent results – maybe my heart was not in it from the beginning), then moved on to the stone wheel in combination with oil-stone – condemned too noisy, messy and way too many sparks flying for wooden studio floors. That left me stranded for a while with the strop. I gave a leather belt a chance while working with a curved shoemaker’s knife. Reminiscent of an old-school barber shop, I did not get a handle on that combo at all – neither the curved, one foot long knife, nor the leather belt hanging from my bench. I had some surprising results with a tiny diamond stone. It took the purchase of my Rolls-Royce of a lip knife, handmade by the artisan knifemaker, to finally end up with a set of decent sized diamond-stones.

Recommended by the maker, I took to the process of shaping and sharpening on the diamond stones in combination with a few drops sewing machine oil. To complete the cycle an extensive period of stropping on the rouge. Again- you might find this technique not satisfactory for you. In addition – like all things – it takes good time, focus, a certain strength and flexibility of your hand – and above all some experience to get to the desired result. This method has served me well – though I still ask and listen when other makers explain their process though, I give it a whirl, read up on techniques and angles on how to hold and shape the edge of all these different knives. Never stop improving, learning, mastering. In any case – one needs ALWAYS a sharp knife. That’s for sure. A blunt knife is dangerous – and makes any job harder to complete with precision.
What I use as my all-rounder is a paring knife. The blade is English steel, sharpened to a beveled edge on one side and a flat edge on the other. (It comes unbeveled and blunt, so one has to dedicate time and effort to get it to the desired condition.) It is manufactured in Sheffield, England by an old company that has a long tradition of making tools for the footwear and leather trade. It is a very basic, no-frills knife that goes a long way. My paring knife is great for skiving both light- and heavy-weight leather. Skiving is a technique of slicing leather down at an angle from full thickness to barely 1 to 2 cm wide, depending on the purpose. I also use my paring knife for all types of trimming. It also works well for scoring and carving/shaping stacked leather heels.

Another knife I use a lot and sits really great in my hand is a Japanese skiving knife. I prefer the one that is 1 inch wide with an edge that is beveled on both sides. Great for skiving lightweight leather, works great for very small angles. I also like to use it occasionally for trimming/skiving heavyweight leather.

I would be really sad without my lip-knives—which are used for trimming outsoles without endangering the upper leather. I have two that I use, for a variety of tasks. They are very different from each other. One is quite basic but it sharpens easily. It fits quite well into the palm of my hand. The other one I simply call the “Rolls-Royce.” It is made by a custom knife maker in Minnesota. A lot of thought and time went into its development. It is ergonomically shaped and very heavy, with a short blade. An amazing knife – it takes a lot of skill and patience to sharpen it. But when it is sharp – WOWZIE!

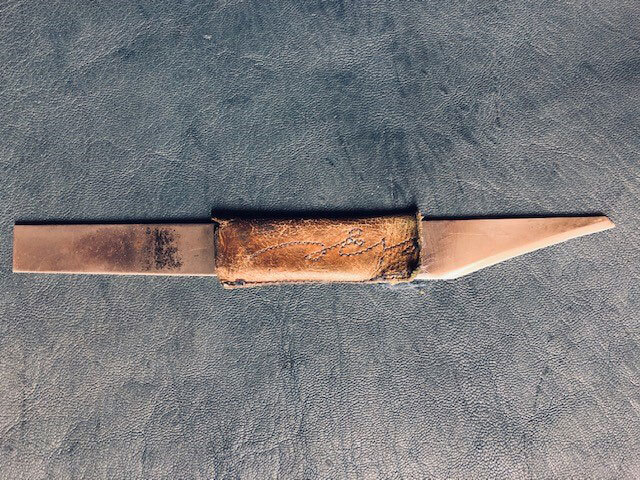
The most recent addition to my collection is a knife I crafted myself from a steel saw blade, under the watchful eye and instructions of another shoemaker. It was great fun and it taught me a great deal about sharpening and keeping a blade sharp. This knife is a very basic all-rounder—one can never have enough of them. It is quite short and the blade is exactly the length I want—I made it, so I made it to my specifications.
The moral of the story is: Whether you are a professional or hobbyist, try out as many knives as you can. Work with them, sharpen them. That’s the only way to find the one knife that really elongates your fingers and magnifies your strength, technique and flexibility. And with time and practice, the skill will come.
To many knife adventures.


You may have seen Japanese gardening tools popping up more in stores and online. Sure, they&rs… Read More

Imagine if you could save the earth by starting a fire in your garden. Sounds crazy? Maybe,… Read More

Pollinator gardens have been in the news these last few years. Most of the articles focus o… Read More