


There are plenty of reasons to get started with grafting. You can grow a flower that would not normally survive the surrounding environment, create some interesting cultivars, and expand your gardening skillset by understanding how to graft plants you already have in your garden or that are available at a local nursery. If you have purchased the Set of Professional Grafting Tools from Garrett Wade, then you are well equipped to get started! We will cover the following:
Budding With the Large Grafting Tool
Budding provides a particularly challenging and very satisfying option to the gardener. Roses, apples, peaches and sweet gum (Liquidambar) are among the plants commonly budded, usually in late spring or summer. The Pro Grafting Tool T-Blade provides us the chance to explore this rewarding part of grafting.
- The T-Blade cuts a vertical notch in the side of the parent (rootstock), and, using the same blade, cuts a single bud from the plant to be grafted onto the stock.
- Taking care not to damage the bud, insert it into the hollowed section in the stock.
- Using a single fixed blade for both cuts insures a good fit and the best chance that the cells of the bud and stock will unite for a healthy, successful graft. During this operation it is very important not to touch the bud with your fingers to avoid damaging it.
- Seal up the area with wax and tape, being careful not to cover or damage the bud. Practice good hygiene – always clean and sterilize your tools and knives before and after grafting.
Using the Large Grafting Tool
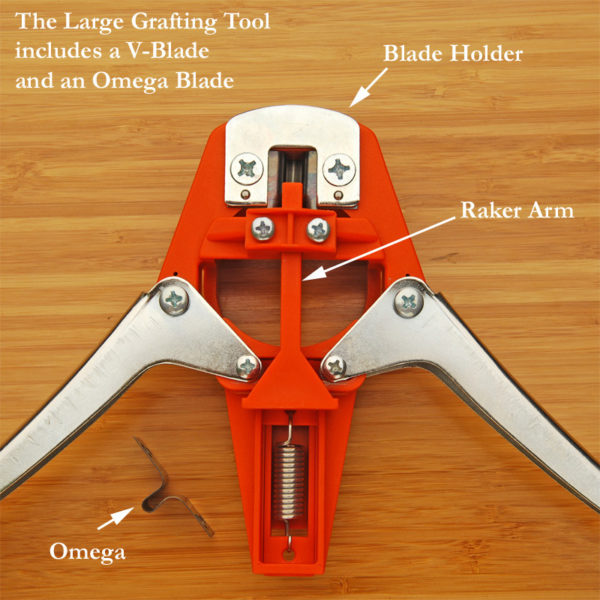
Large Grafting Tool is designed for stock larger than ½” as in the image to the left in which three pencil- sized scions (cultivars) are side grafted to a 1-1/2” diameter seedling pecan rootstock. The Large Pro Tool comes with two blades – a V-Blade and an Omega Blade – that will cut a side-notch in stock up to 1-3/4” in diameter. With the corresponding blade, use the Standard Pro Grafting Tool to cut a scion which will be an exact match. Carefully matched joining parts which align the critical cells of each plant are a key to successful grafting. The depth of the notch should match the diameter of the scion. If the stock is a little small (about 1”) use a soft material to block it out in the tool (like a rag, or rolled up paper towels). Take care not to damage the stock. Make clean cuts – never tear away partially cut bark. A raker arm helps extract the blade from the cut notch. We have included instructions on changing blades.
Replacing the Blades on the Grafting Tool
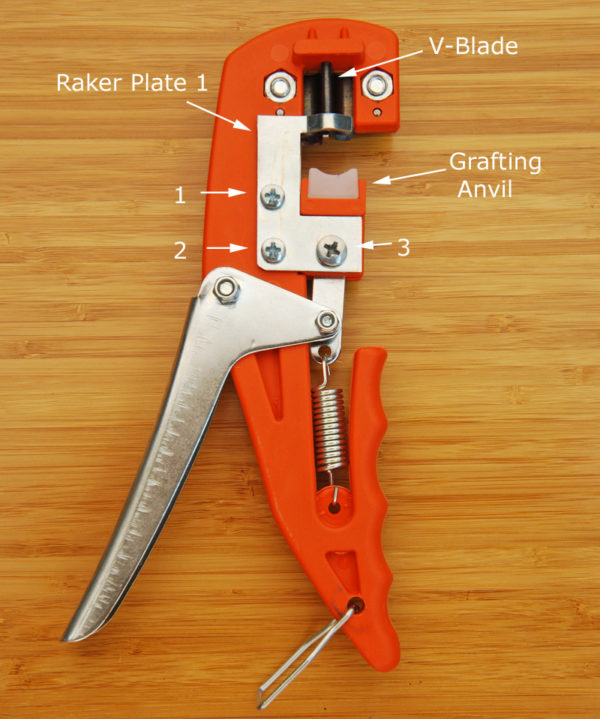
The Standard Grafting Tool
The Standard Grafting Tool has space for a V-blade and Omega-blade for scion grafting, and a T-blade for budding. Each blade is held fixed in the tool. Squeezing the handle raises the moving carriage anvil into the blade. The V-Blade and the Omega Blade use the anvil that comes on the tool (shown here). The T-Blade uses the separate Budding Anvil. Instructions for changing to the T-Blade and Budding Anvil are further down. Changing from the V-Blade to the Omega is a simple operation. Follow the steps in the image above to change between the V-Blade and the Omega.
Note: It is not necessary to remove Raker Plate 1 to change grafting blades. Simply loosen the locknuts enough that you can slip the blade out.

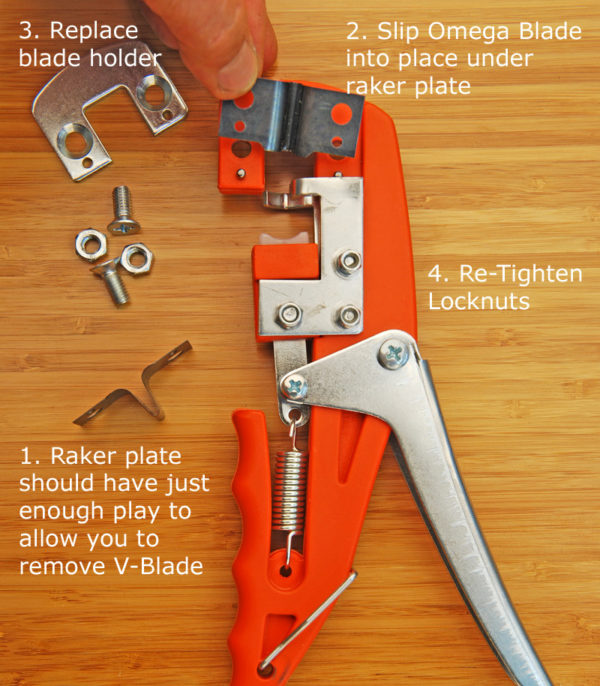
Changing Between V-Blade and Omega Blade (O-Blade)
- Unscrew locknuts 1, 2, 3 to remove Raker Plate 2, but leave just enough room to slip a blade underneath.
- Slip omega blade into place under Raker Plate
- Replace blade holder and tighten locknuts.
Changing Grafting Anvil to Budding Anvil with T-Blade
Budding requires a different setup to provide the support for the T-Blade to make proper cuts. Nevertheless, the process is still quite simple. You will need to replace the grafting anvil with the specialized budding anvil. In addition, you will only keep Raker Plate 2, so be sure to keep the unused Raker Plate 1 and spacers in a secure space until you need them again.

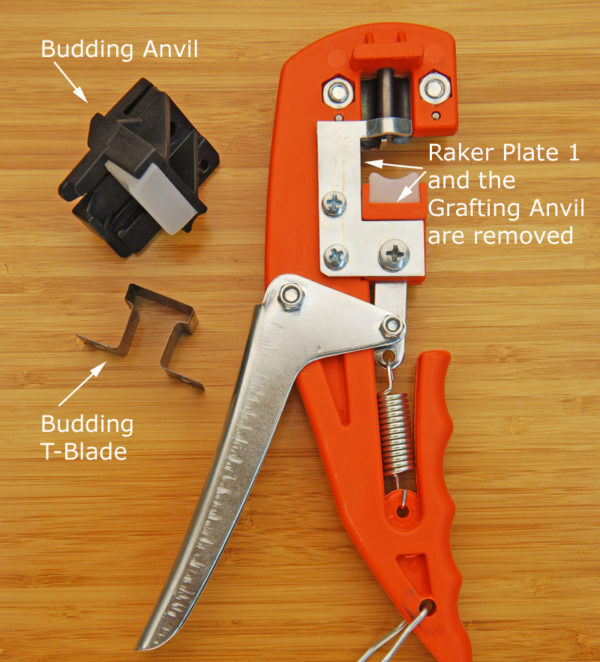
STEP 1
Remove Omega blade, grafting anvil, and Raker Plate 1 & 2 (only #2 will be reattached. Keep #1 secure).

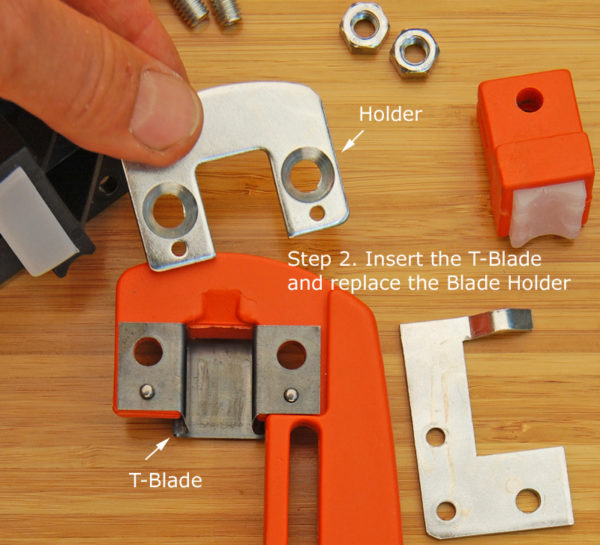
STEP 2
Insert T-Blade and replace Blade Holder
STEP 3
Align hole 3 of budding anvil to the carriage arm (previously holding the grafting anvil). Holes 1 and 2 will line up with the slot on the tool.

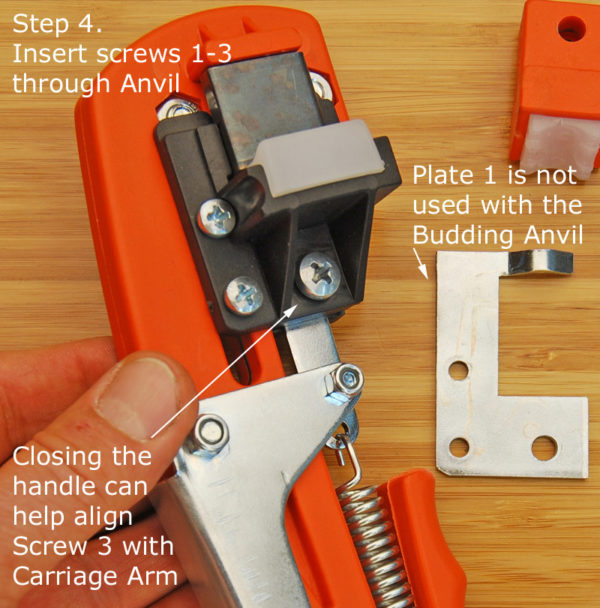
STEP 4
Insert Screws 1, 2, and 3 into anvil holes. Closing handle may help with attaching Screw 3.
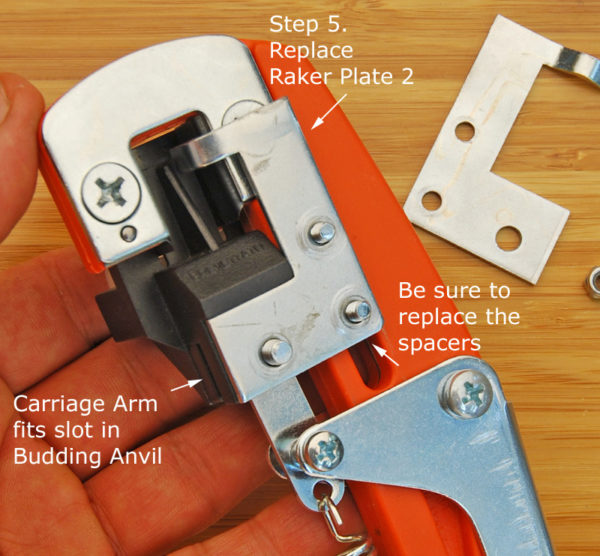
STEP 5
Replace Raker Plate 2. Be sure to replace the spacers. The budding anvil should fit in the slot of the carriage arm.
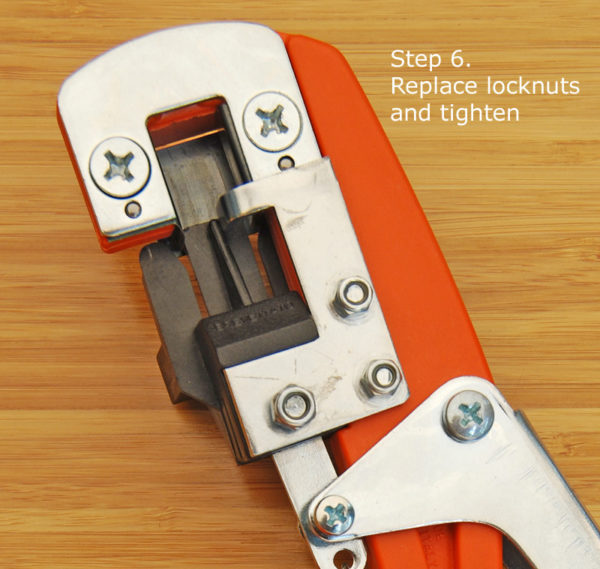
STEP 6
Replace locknuts and tighten. Enjoy!
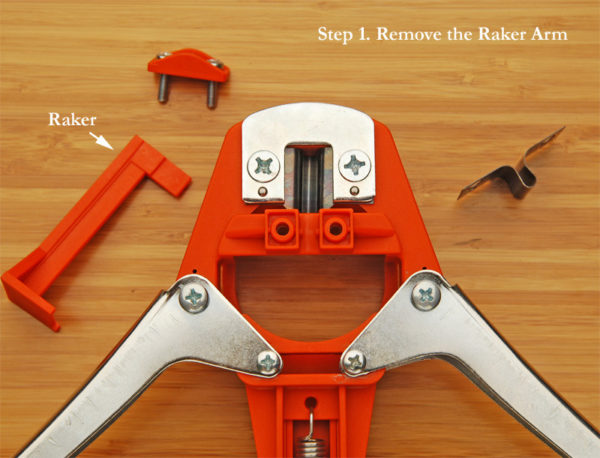
Changing Blades on Large Grafting Tool
The Large Grafting tool makes cuts to rootstock 1/2″ or larger and you can attach multiple scions to your graft area as a result. The raker arm is there to help make a clean cut because a messy cut may expose the underlying cambium to water or infection, as well as form an improper graft. The tool comes with a V-blade and an Omega blade. Changing the blades for this tool is as simple as for the standard tool.
STEP 1
Remove raker arm and blade holder.
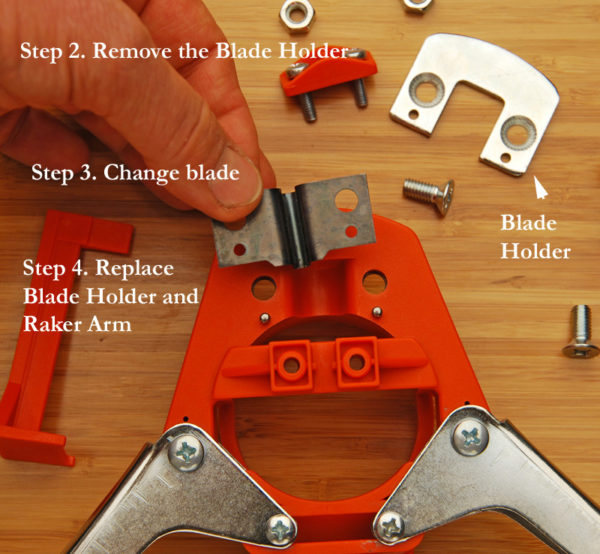
STEP 2
Change blade. Replace raker arm and blade holder.
Using Grafting Tape
The key advantages to paraffin tape is largely that it allows air to circulate, but keeps out debris and water, so that the rootstock and scion are provided with the necessary carbon dioxide to create the compounds they need to form the graft. In addition, tape provides the stability for the graft to form in the desired shape. The tape should cover the area and form a tight seal, but not too tight, either. We recommend adding grafting wax to fully seal the bond.
Like any project with some technical and scientific content, grafting takes a bit of time to digest the elements and become proficient, but this can be a very rewarding activity for anyone in the garden or in the orchard. Plan carefully prior to starting any grafting project to give yourself the best chance at success. Read various sources as you prepare. Refer to the information included in the species and seasonal charts.


