


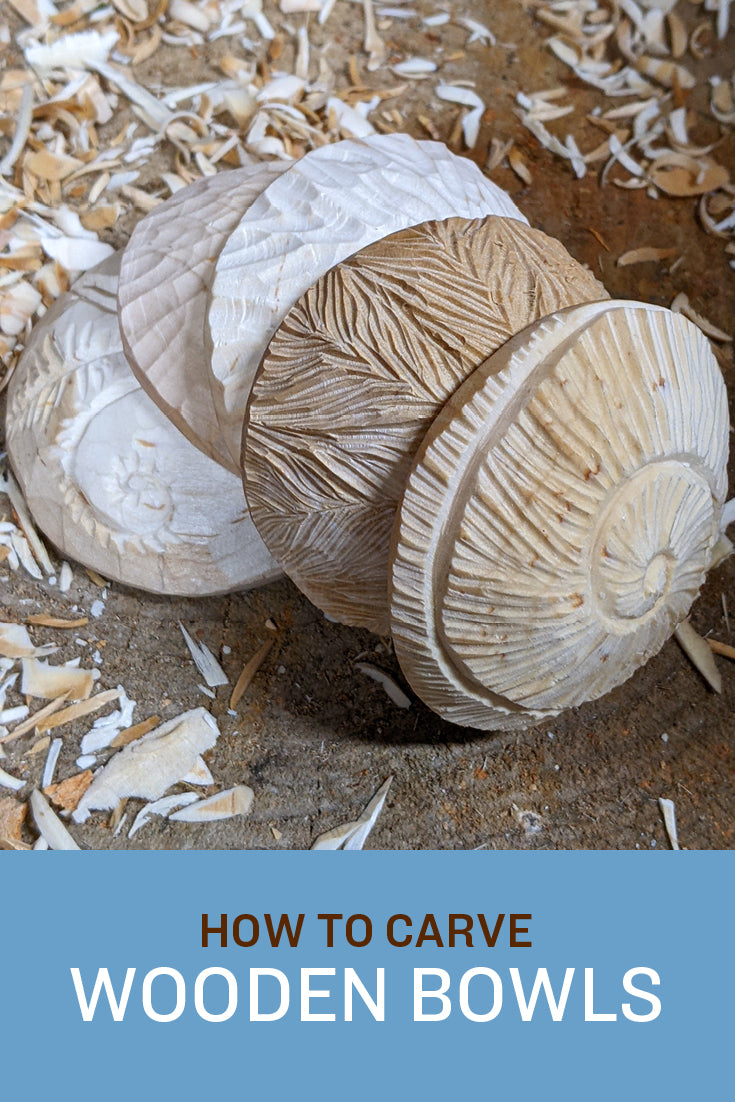
A noteworthy woodworking trend of 2022 is an exploration of textures in wooden bowls. Bowl carving is a very broad and interesting branch of woodworking. My first attempt at bowl carving was about 8 years ago. I tried to carve a large salad bowl with only a few hand tools. Neither I nor my joints recommend starting with a bowl that large. These tiny bowls for sauces or charcuterie boards are a great way to experience the process and techniques of bowl carving without investing in a lathe or large adzes. This article will explain how to carve these tiny bowls that will look quite impressive on your next charcuterie board or dinner table. They require a handful of essential tools and are a great way to introduce the basic skills of hand-carved wooden bowls. The Power Grip carving chisels are a great way to achieve the textures because each set has so many chisel options and they are a joy to carve with. The bowls are treated with Tung Oil for a durable waterproof finish.
Tools and Materials:
1. A Birch Log (or any hardwood measuring at least 6” diameter)
2. Splitting Tools (I used a sledge hammer and wedges)
3. Marking Tools (such as a compass or template)
4. Hatchet
5. Saw
6. Spoon Carving Knives (a straight knife and a hook knife)
8. Sandpaper
9. Half & Half Tung Oil and Citrus Oil for Finishing
Steps
1. Split the log and carve your blank to the desired dimensions
Split the log. Trim down the blank with your hatchet until it measures 2” deep by 4” wide and 4” times the number of bowls in length. For instance, I am carving 3 bowls per blank, so my blanks measure 2” x 4” x 12”. The extra inch of room for these 3 ½” bowls will give you space to saw them apart from each other later. I recommend carving multiple bowls per blank so that they are easier to carve with a hatchet later on.
2. Measure out the center points and draw circles in the wood with a compass
Find and draw a center line, running the length of your blank. For a 4” wide blank, the center line should have 2” on either side. Then, mark a center cross hatch down the blank at the 2”, 6” and 10” points. Set your compass to a 1 ¾” radius, and place the metal awl side on the center point and mark out a circle around each line. The circles on your blank should have space between each one and on either side. If you do not have a compass or a circle template, you can also find a yogurt lid or plastic bottle cap of an approximate size and trace it.
3. Hollow out the insides of each bowl
The bowls are easiest to carve while they are still in the blank because you have more to hold on to. Using your hook knife, hollow out the centers of each bowl. It is helpful to begin by carving across the grain. If you are carving green wood, don’t worry about getting it perfectly smooth in the green phase, just even enough that it won’t crack when it dries. Step 5 outlines some techniques for drying greenwood bowls to avoid cracks. If you are using cured wood, drilling out the center with a large drill bit will save time and effort. Just be sure not to drill too deeply. Clean up the edges and shape the bowl with your hook knife.
4. Carve the outsides of the bowls and then separate them
First, using your saw, cut stop cuts on either side of the bowl intersections, leaving about an inch of wood connecting each bowl. Then, with your hatchet, round each bowl while they are all still connected. This make them easier and safer to carve with a hatchet by giving you a larger project to hold and distancing your hand from the area being carved. When you are satisfied with the shape of each bowl, saw through the final inch connecting each bowl. With your knife, finish shaping the outsides of each bowl, aiming for consistent wall thickness, especially in the end grain of your bowls.
5. If you are carving green wood, allow your bowls to dry
If your wood is still green (uncured, fresh wood) then it will need to dry before proceeding. If the bowl walls are uneven, then it will dry at uneven rates. Some areas of the bowl will shrink and it will pull itself apart, causing cracks. Your goal when drying the bowls is to allow them to dry as evenly as possible. This can be done by carving them as evenly as possible, but also by slowing down the drying process. Making a higher humidity atmosphere will allow the wood to even its moisture levels out as it dries, which greatly reduces the risk of cracking. Two good techniques to try are:
- The woodchip method: save the green woodchips from hollowing out the bowls and submerge the bowls in them. They will act as a buffer between the bowls and the air and allow for a much more even drying rate.
- The Ziploc bag method: if you have limited space, or simply don’t want a designated bin full of woodchips and unfinished projects in your house, you can achieve a similar effect by putting the bowl in an open Ziploc bag and storing in a cool place. The bag traps some moisture while allowing most to escape, just like the wood chips. Avoid sunbeams or warm parts of the house because they might dry out the bag too quickly.
6. Carve decorations:
a. Small Radiating Lines:
Draw radiating lines on your bowl, dividing it into 8 wedge-shape sections. With the small u-shaped gouge, alternate between carving diverging lines and converging lines on each ‘spoke’. Then, connect those lines together, making a radiating wavy line pattern.
b. Large Radiating Lines
Draw radiating lines on your bowl, dividing it into 8 wedge-shape sections. With the medium curved gouge, alternate between carving diverging lines and converging lines on each ‘spoke’. Then, connect those lines together, making a wavy faceted pattern.
c. Chunky Facets
Draw 8 radiating lines on the back of your bowl, dividing it into 8 wedge-shape sections. With the larger deep gouge, begin by carving from the center, radiating outward around the bowl. With each turn, move farther down the bowl for a consistent texture.
d. Snail Shell
Draw 8 radiating lines on the back of your bowl, dividing it into 8 wedge-shape sections, and draw a spiral starting at the center and running to the edge. With a V-shaped gouge, carve the spiral. You can tilt the gouge to one side to slightly undercut the spiral and give it a more 3-dimensional appearance. Use the skew chisel to round either side of the v-cut spiral. With the small u-shaped gouge, carve radiating texture following the 8 initial lines as a guide.
e. Ferns
Draw one line across the center of the bowl. One the left side draw a fiddlehead spiral to the left and a slightly curved line originating from the same base but arcing above the spiral. Repeat the design flipped and upside down on the other half. Carve the spirals and the 2 lines with the V-shaped gouge. Using the u-shaped gouge, add small fern leaves to either side of the fern branches and both fiddleheads.
7. Sand and Finish with Tung Oil
Beginning with 120 grit, gently sand the tops of the textured designs and the rims and insides of each bowl. Since the power Grip chisels are so sharp, you likely will not have to sand the actual tool marks of each design. Move up to 220 and finish with 400 or 600 grit. Using a paintbrush, apply a generous coat of Half & Half. This is a mixture of tung oil and citrus solvent to help it penetrate the wood better. The tung oil is a drying oil and will give each bowl a beautiful, durable finish.
Once you carve these tiny bowls, you may get decently obsessed with bowl carving. If you want more design inspiration, be sure to check out Elizabeth Weber on Instagram @icosa_woodworks. Another great way to add a personal touch to these bowls is to paint them with milk paint. Milk paint is a porous, non-toxic paint that is especially durable when coated with tung oil. Once the oil has dried, your bowls are ready for their charcuterie debut. Enjoy!


